
Embarking on your own DIY project or diving into electronics repairs? One of the most crucial skills you need to acquire is learning how to use a multimeter. This comprehensive guide will unlock the potential in your hands, transforming you from a novice to a savvy user of this indispensable tool. A multimeter, your secret weapon in mastering the language of electronics, allows you to measure voltage, resistance, and current, paving the way for effective troubleshooting and repairs. Whether you’re a budding electrician or a seasoned technician, understanding how to wield a multimeter can supercharge your capabilities. Let’s ignite your electrical knowledge, step-by-step, in this complete tutorial on mastering the art of using a multimeter. Just knowing how to measure a few simple things, and combining this knowledge makes you capable of solving all your electrical mysteries!
- Top-rated Multimeter for Beginners and Professionals: A Must-have for Every Toolkit
- How to measure the electrics of your car, motorcycle, or any other battery-powered device (DC)
- Learn How to Measure Home Outlets with a Multimeter (AC)
- Using the Clamp Feature on Your Multimeter to Measure Amperes
- No More Guessing: How to Check Lightbulbs and fuses for Continuity with a Multimeter
- Frequently Asked Questions (FAQ)
Top-rated Multimeter for Beginners and Professionals: A Must-have for Every Toolkit
There are many different kinds of multimeters, and they’re in different price ranges as well. The good news is that the cheap ones are as useful as the expensive ones! An expensive one only makes sense when it’s important that your measurement is very precise. This is probably not the case if you’re reading this article on how to use a multimeter. You can solve all your problems with an almost accurate (cheap)multimeter. If you already own a multimeter it will probably work fine. You can also buy one at a cheap dollar store. And that also works fine. If you want to own a multimeter that is useful for a lifetime. And still don’t want to spend a ridiculous amount of money. Our Chinese friends got us
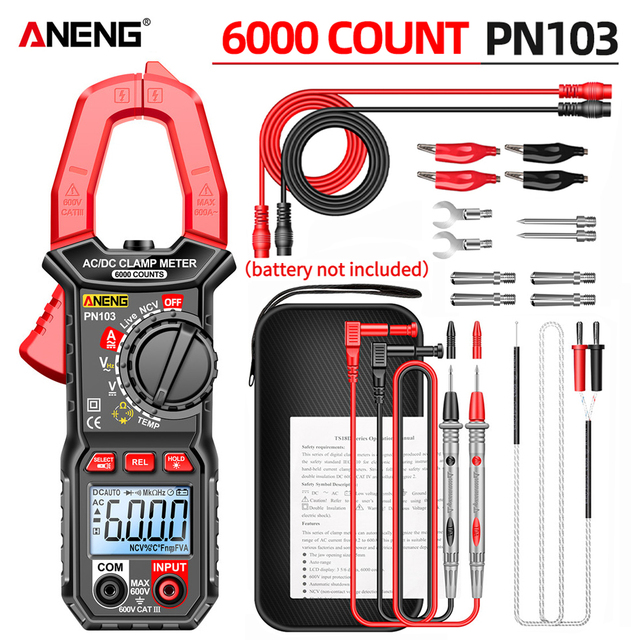
Unlock the power of precision with this top-rated, all-in-one multimeter, a must-have addition to any toolbox. Not only can this versatile tool carry out all the standard measurements you’d expect from a high-quality multimeter, but it also steps up its game with an integrated clamp for accurate amperage measurements directly from any wire. Without the need
But that’s not all! This gadget even boasts a live-wire detection feature, making it an invaluable companion for tracing the hidden network of wires in your walls. It’s the perfect blend of functionality and safety, designed with you in mind.
While similar products would set you back around $70 in your local hardware store, this multimeter is sourced directly from China, offering the same robust performance at just a fraction of the price. That’s right – for only 1/4 of the cost, you’ll get a reliable, versatile multimeter that we use and trust for our own projects.
So why wait? Grab your multimeter today and elevate your DIY or professional projects to a new level of expertise
How to measure the electrics of your car, motorcycle, or any other battery-powered device (DC voltage)
Why and When to Measure DC Voltages
Car enthusiasts often encounter electrical issues that demand DC voltage measurements. Whether it’s diagnosing a battery that won’t hold charge, a dimming headlight, or a malfunctioning stereo, knowing how to measure DC voltage is crucial. Similarly, motorcycle riders, RV users, and boating enthusiasts will find DC voltage measurements invaluable in keeping their rides running smoothly.
Homeowners and DIY enthusiasts also frequently grapple with battery-operated appliances, devices, and tools. Everything from laptops to cordless drills operates on DC voltage. Being adept at measuring these voltages can mean the difference between reviving a device and resigning it to the junk pile.
Mastering DC Voltage Measurements with a Multimeter
Equipped with a versatile multimeter, you’re ready to decode the mysteries of DC voltage. Let’s dive into the process.
- Set the Dial: Start by setting your multimeter to measure DC voltage. Most multimeters denote this with a ‘V’ accompanied by a straight line or dash. Some older models even want you to choose if the range will be for example 20V or 200V. If you’re unsure how much voltage you should expect. Start with the high range. If the reading is within the next lower range, lower your range.
- Connect the Probes: Once you’ve set the dial, it’s time to connect the probes. Attach the black probe to the COM port and the red probe to the port labeled with a ‘V’ or similar.
- Measure the Voltage: To measure DC voltage, touch the black probe to the negative terminal of your device or battery and the red probe to the positive terminal. This can be at the end of the wire, or any other piece of uncovered metal that is conducting electricity. If you’re unsure which wire is positive and which one is negative. Don’t worry! The multimeter will give a negative reading if you have the black probe on the positive wire and red on the negative. Now you also know which wire is what.
- Read the Results: Once the probes are in place, you can read the measurement on your multimeter’s display. If the reading is negative, it means you’ve reversed your probes.
Becoming proficient in measuring DC voltages with a multimeter opens a new realm of electrical troubleshooting and diagnostics. Armed with this knowledge, you can tackle a range of problems in your vehicle, home, or on-the-go electronics. So power on your multimeter and delve into the world of DC voltages!
Learn How to Measure Home Outlets with a Multimeter (AC)
Unlike Direct Current (DC), where electrons flow in a single direction, Alternating Current (AC) changes direction periodically. How often it changes direction is given in hertz (changes of directions per second). This continuous change of direction allows AC to carry energy across long distances with minimal losses, making it the preferred choice for powering our homes and businesses. So that’s why all your home outlets are AC (alternating current).
Where You Encounter AC Voltage
As the predominant form of electrical power, AC voltage is omnipresent. It powers everything from our homes to our offices, from the tiny bulb illuminating your bedside lamp to the machinery in large-scale industries. When you plug a device into a wall socket, you’re tapping into AC voltage. Common household appliances such as refrigerators, washing machines, televisions, and air conditioners all operate on AC voltage. Even many of our handheld gadgets, like laptops and phone chargers, convert AC from the wall socket into DC for the device to use.
You can also encounter this when you have fluctuating direct current. There are plenty of examples when there’s supposed to be dc. But it fluctuates so much that your multimeter can only read it in AC mode. For example when you’re measuring wires directly from your coil. Because it goes in the rhythm of your engine, your multimeter will only read this in AC mode.
Measuring AC Voltage with a Multimeter
Measuring AC voltage is almost the same as measuring DC voltage. But this time you turn the dial on your multimeter on ‘V’ accompanied by a wave or squiggle (~). Again, if you have an older multimeter that doesn’t automatically set the range. If you don’t know what to expect. Start with the highest range and work your way down for more precise results.
Connect the Probes: Connect the black probe to the COM port and the red probe to the port labeled with a ‘V~’ or similar.
Measure the Voltage: To measure AC voltage, touch the black probe to one side of the power source (e.g., a wall outlet or an appliance plug) and the red probe to the other side. Be very careful to avoid any direct contact with electricity.
Read the Results: Once the probes are in place, your multimeter will display the voltage. Unlike DC measurements, you don’t need to worry about probe orientation with AC.
Understanding and measuring AC voltage is a key skill for anyone interested in electrical work, and a good multimeter is your most valuable ally in this task. With this knowledge at your disposal, you’ll be well-prepared to troubleshoot a wide range of electrical issues at home or in the workplace.
Using the Clamp Feature on Your Multimeter to Measure Amperes
- Set to Ampere Mode: Rotate the multimeter’s dial or select the “A” option from its menu. Most multimeters will have a symbol resembling a clamp or an “A”, indicating the ampere or clamp mode.
- Open the Clamp Jaw: Press the lever or button on the multimeter to open the clamp’s jaws. Ensure they open wide enough to fit around the wire you’re testing.
- Clamp Around a Single Conductor: For accurate readings, ensure you clamp the jaws around a single wire and not the entire cable. This is vital for accurate current measurements.
- Read the Measurement: Once clamped, the multimeter will display the current flowing through the wire. It’s typically measured in Amperes (A).
No More Guessing: How to Check Lightbulbs for Continuity with a Multimeter
Electrical troubleshooting often goes beyond merely deciphering voltage or current readings. A fundamental yet powerful aspect of this process is continuity testing – a simple procedure that reveals a wealth of information about the status of an electrical circuit. In this article, we delve into the practical implications of continuity tests, common situations where they prove handy, and how to execute these tests using a multimeter.
Understanding Continuity Testing
Continuity is a simple concept: it tells us whether a circuit is complete and ready for current to flow from one end to another. A continuity test, performed with a multimeter, allows us to determine whether two points in an electrical system are connected. This invaluable test is often the first step in diagnosing and repairing electrical issues.
Everyday Applications of Continuity Testing
Continuity testing comes into play in a multitude of everyday scenarios, and owning a multimeter turns you into a home or workplace troubleshooter. Combine this with common logical thinking and you can almost solve any problem!
Imagine a light bulb has suddenly stopped working. Is it really the bulb, or is there a problem with the circuit? A continuity test can confirm whether the filament inside the bulb (non-LED) is intact, thus determining if it’s the bulb that needs replacing.
When you have a fuse and you’re unsure if it’s still good. Test it for continuity. If it makes contact the fuse is good. If not, throw it away!
Another common use is verifying switches and relays. If a switch doesn’t seem to be working, a continuity test can reveal whether the contacts are making the right connections when the switch is turned on.
Additionally, if you suspect a short circuit, a continuity test can help locate the issue. By checking for continuity in places where there shouldn’t be any, you can pinpoint where the unintended connection lies. For example in an electric engine
Performing Continuity Tests with a Multimeter
With a multimeter at your disposal, performing a continuity test is straightforward. Keep in mind that if you test continuity you don’t want to have electricity on the wires! This will probably break your multimeter! If you have electricity on your wires, simply measure voltage to see if they connect or not
- Set the Multimeter: Set your multimeter to continuity mode or ohms(Ω). This is often denoted by a symbol that looks like a Wi-Fi signal, a series of arcs, or just the Ω.
- Probe the Circuit: Touch the probes to the points you wish to test for continuity. It doesn’t matter which probe goes where since continuity isn’t directional like voltage.
- Interpret the Reading: If there’s continuity (i.e., a complete circuit), your multimeter will either display a very low value (close to zero) or make a sound (usually a beep). If there’s no continuity, you’ll see a high value or the multimeter will remain silent.
Continuity testing is an essential skill for anyone interested in electrical work. With this tool in your arsenal, you’re equipped to diagnose and solve a myriad of electrical problems in your home or workplace.
FAQ on Multimeters and Electrical Measurements
- How does wire size impact the measurements on my multimeter?
The wire size can greatly influence the resistance and subsequently, the voltage drop across a circuit. It’s essential to choose the right size, especially for DC circuits. Learn more about what size cable you need for DC circuits. - Are there any additional tools electricians commonly pair with multimeters?
Yes, electricians often use an array of tools alongside multimeters. From wire strippers to pliers, the right toolkit is vital for safety and accuracy. Dive into the list of tools electricians use for a comprehensive overview. - What’s the difference between auto-ranging and manual multimeters?
Auto-ranging multimeters automatically select the appropriate range for the measurement you’re making, whereas with manual ones, you need to select the range yourself. - Can I use a multimeter to determine the quality of my electrical connections?
Yes, continuity testing using a multimeter can help identify broken connections or short circuits, ensuring the efficiency of your electrical systems. - Is it safe to use a multimeter on all household appliances?
Yes. Just don’t test continuity with live wires. And always make sure that the device you’re measuring doesn’t exceed the reading of your multimeter